
How to Capture the Perfect Underwater Photos While Snorkeling in Komodo
Komodo Island Snorkeling Editorial Desk 21 min read
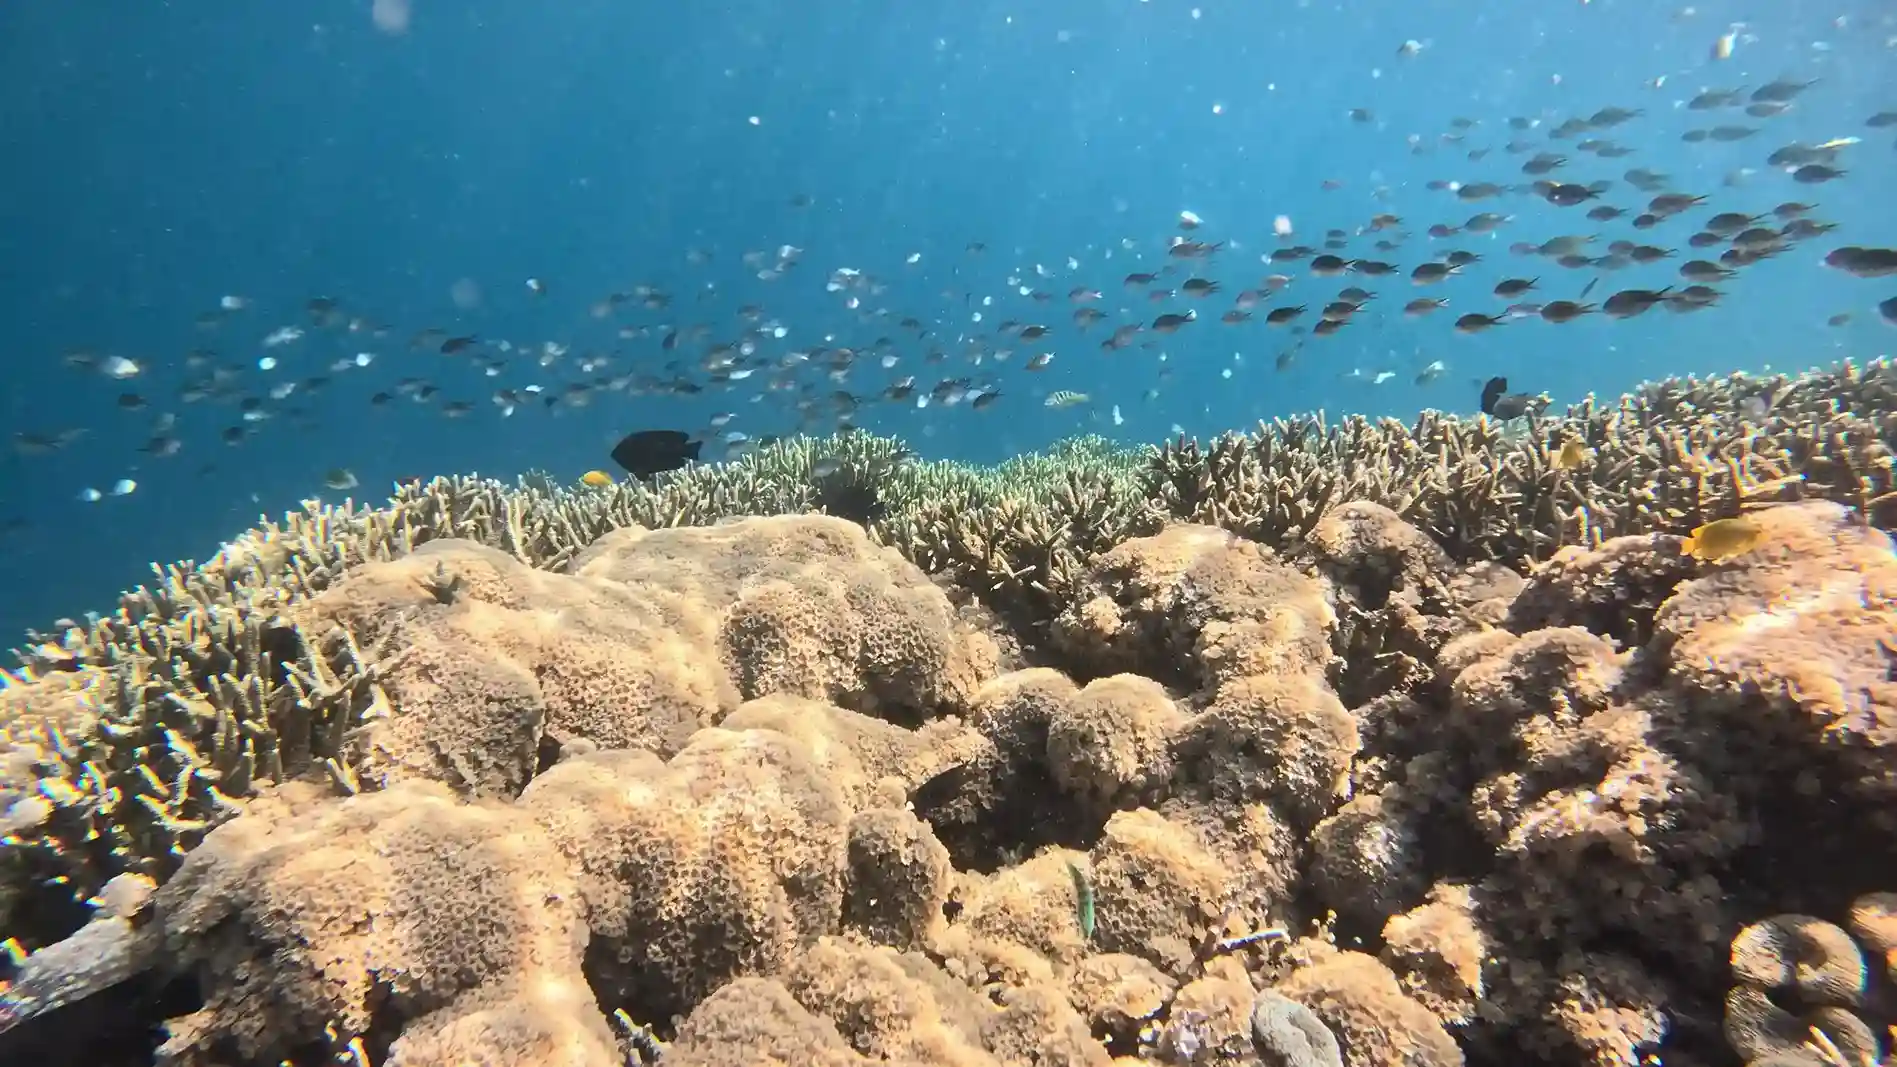
For capturing the perfect underwater photos while snorkeling in Komodo, use natural light, maintain a calm presence in the water, and experiment with angles for dynamic shots.
Essentials of Underwater Photography Snorkeling Komodo
Komodo’s clear waters and diverse marine life offer an exceptional setting for underwater photography. To make the most of your snorkeling experience, mastering basic techniques and understanding the unique challenges of underwater photography is crucial. By incorporating a few practical tips, you can capture stunning images that reflect the beauty of Komodo.
Snorkeling in Komodo National Park provides an opportunity to photograph a rich array of marine species, from colourful coral reefs to majestic manta rays. With water visibility often exceeding 20 metres, photographers can take advantage of the natural light and vibrant underwater landscapes. However, the dynamic nature of the aquatic environment requires careful preparation and technique to ensure the best results.
Use of Natural Light
Natural light is your best ally in underwater photography. The waters around Komodo are known for their clarity, allowing sunlight to penetrate and illuminate the vibrant marine life. Aim to snorkel between 10 a.m. and 2 p.m. when the sun is at its highest. This ensures optimal lighting conditions, reducing the need for artificial lighting, which can sometimes wash out colours. The angle of the sun during these hours helps to highlight the vivid hues of the coral and the iridescent scales of fish.
When using natural light, be mindful of the sun’s position relative to your subject. Position yourself so that the sun is behind you, illuminating the subject directly, which enhances colour saturation and detail. If possible, avoid shooting directly into the sun to prevent glare and lens flares.
Best Snorkeling Photo Techniques
- Get Close: The closer you are to your subject, the clearer and more vibrant your images will be. Water reduces contrast and sharpness, so proximity helps mitigate these effects. Try to approach your subject slowly to avoid startling it, maintaining a distance of less than one metre for optimal clarity.
- Steady Shots: Keeping your camera steady is crucial. Consider using a stabilizer or a camera with a built-in stabilization feature to minimize motion blur. Practicing controlled breathing and using your body as a stabilizer can also help maintain steadiness.
- Experiment with Angles: Shooting upwards towards the surface can create dramatic effects with light and shadows. Try different angles to find the most dynamic compositions. Angling your camera upwards can capture the play of sunlight on water surfaces, while a downward angle can emphasize the depth and texture of the seabed.
Equipment Considerations
Your choice of equipment can greatly influence the quality of your underwater photos. A waterproof camera or a durable underwater housing for your existing camera is essential. Additionally, a camera with a wide-angle lens is beneficial for capturing expansive scenes and accommodating the diverse environments found in Komodo.
Consider investing in a camera with at least 12 megapixels for high-resolution images. A wide-angle lens, ideally 24mm or wider, allows you to capture more of the scene in each shot, which is particularly useful when photographing large subjects like coral gardens or schools of fish. Ensure your camera’s housing is rated for depths of at least 10 metres to withstand the pressures encountered while snorkeling.
Understanding Marine Life Behavior
Observing and understanding marine life behavior can significantly enhance your photography. Different species exhibit distinct patterns and behaviors which, if anticipated, can lead to more compelling photographs. For instance, knowing when certain fish are more active can help you plan your shots more effectively.
Many marine creatures are most active during the early hours of the day or late afternoon. Research the habits of specific species you hope to photograph, such as the feeding patterns of parrotfish or the cleaning stations frequented by manta rays. This knowledge can help you position yourself at the right place and time to capture unique interactions and behaviours.
For more detailed guidance on snorkeling in Komodo, visit our comprehensive guide.
2027 Note: Adapting to Technological Advances
With advancements in technology by 2027, new tools and cameras offer exciting possibilities for underwater photography. High-definition cameras with enhanced stabilization and improved low-light capabilities are now more accessible. These innovations allow photographers to capture more accurate representations of Komodo’s underwater world.
Consider exploring cameras with advanced sensor technology that can perform well in low-light conditions, such as those equipped with back-illuminated sensors. These can significantly improve image quality in deeper or shaded areas where light is limited.
For personalized snorkeling experiences, see the customized snorkeling options set out in our customization guide.
FAQ
What are tips for capturing great underwater photos while snorkeling in Komodo?
To capture great underwater photos in Komodo, use natural light, get close to your subject, and keep your camera steady. Experiment with different angles and be patient to observe marine life behaviours. Plan your snorkeling trips during optimal sunlight hours for the best lighting conditions.
How can I prevent my underwater photos from looking washed out?
To prevent photos from looking washed out, shoot during optimal lighting conditions, avoid using flash, and ensure you are as close to the subject as possible to enhance colours and contrast. Adjust your camera settings to manual white balance to better capture the true colours of the underwater environment.
What equipment is essential for underwater photography while snorkeling?
Essential equipment includes a waterproof camera or underwater housing, a stabilizer, and a wide-angle lens to capture detailed and expansive underwater scenes. Consider a camera with good low-light performance to capture vibrant images even in shaded areas.
Iconic Photo Locations in Komodo National Park (Above and Below the Surface)
Some of the most iconic underwater photo spots in Komodo are tightly linked to the classic snorkeling route from Labuan Bajo. Planning your shots around these locations will give you a strong mix of reefscapes, big animals, and postcard‑style landscapes.
Padar Island viewpoints and drone considerations
Padar’s sunrise ridge is one of Indonesia’s most photographed landscapes. The main Padar Island top photo viewpoints are reached via a stepped trail (30–45 minutes), with several side platforms for wider angles. Drone use is sometimes restricted or banned: always check updated Komodo National Park rules with your guide, and avoid flying when other visitors are crowding the viewpoints or when wind gusts exceed what your drone can safely handle.
Pink Beach and nearby reefs
Pink Beach Komodo snorkeling photos work best when you combine the rosy shoreline with shallow coral in one frame. Shoot from just below the surface toward the beach on a sunny midday, using a wide lens and natural light. Many visitors also wade waist‑deep and point the camera back toward the hills for half‑underwater “over/under” images that show both the colored sand and the reef.
Kanawa Island and photo‑friendly spots near Labuan Bajo
Kanawa Island snorkeling photos are popular because the reef is accessible right from the jetty and you can capture both coral and the island’s silhouette. It’s one of the most photo friendly snorkel spots near Labuan Bajo for first‑time visitors. Another beginner‑friendly option is to join a day trip focused on calm, shallow reefs; see our overview of top snorkeling destinations in Komodo for 2027 to match sites with your camera skills.
Batu Bolong, Karang Makassar and Manta Point
Batu Bolong Komodo snorkeling photos often show dramatic walls of coral and schools of anthias. The water around the main rock can be over 30–50 m deep, but snorkelers stay near the sheltered side in the top 5–10 m. For manta rays, Karang Makassar snorkeling manta encounters usually involve drifting over a long, shallow rubble field. At nearby Manta Point Komodo, snorkeling photos often capture rays queuing at cleaning stations; stay still, horizontal, and slightly off to the side so they pass naturally in front of your lens.
Planning your route from Labuan Bajo
If your goal is to create a Komodo National Park snorkeling photos portfolio in a few days, prioritize routes that combine reefs, big animals and scenic beaches. Short trips often include Kanawa or nearby islets on day one, then Padar, Pink Beach, and manta areas. For more intensive photo work, consider a multi‑day Komodo liveaboard charter so you can shoot early and late in the day with fewer boats around.
Cameras, Lenses and Housings Optimized for Komodo Snorkeling
Water clarity, strong sun, and frequent big‑animal encounters in Komodo influence what gear performs best. You want compact, wide‑angle setups that are quick to maneuver at the surface yet robust enough for currents.
Best underwater camera options for a Komodo trip
The best underwater camera for a Komodo snorkeling trip is usually the one you can operate confidently in moving water. Modern action cameras such as the GoPro Hero series or DJI Osmo Action work well for video and simple stills. Advanced compact cameras (for example, Canon G‑series or Sony RX100‑class) in housings give better low‑light performance and RAW files, which are helpful for editing Komodo snorkeling footage in Lightroom later.
Lenses for wide reef scenes and big animals
The best lens for underwater shooting in Komodo is almost always a wide or ultra‑wide. Behind a flat port, 24–28 mm equivalent is the minimum for manta rays, turtles, and large coral heads. If your housing supports wet optics, a bolt‑on wide‑angle or fisheye converter lets you get close to subjects while still including the reef, making your Komodo snorkeling underwater photography look more immersive and less “zoomed‑in from far away.”
Underwater housings and rentals in Labuan Bajo
When evaluating underwater housing for Komodo snorkeling, prioritize reliable sealing, easy‑to‑operate buttons, and a secure hand strap or tray for finning in current. Aluminum housings are durable but heavy; polycarbonate is lighter and more budget‑friendly. Underwater camera rental in Labuan Bajo for snorkeling is limited and often booked during peak season; if you rely on rental, reserve early through your boat operator and test the rig in shallow water near the harbor before sailing out.
Special considerations for GoPro and action cameras
GoPro underwater video in Komodo is ideal for fast‑moving scenes like manta passes or schooling fish. Add a red or magenta filter for depths beyond 3–5 m to reduce green‑blue color casts. A small two‑handled tray makes it easier to keep the horizon level during drifts. Always use a floaty or coiled lanyard; losing a tiny action camera in strong current at Batu Bolong or Karang Makassar is surprisingly easy.
Booking trips tailored to content creators
If you’re a photographer or videographer, consider private Komodo boat charters that allow flexible timing at each site. Some Komodo sailing trips can arrange guides familiar with camera handling, assisting you in the water and helping position the group so your shots are less cluttered. This is especially useful when trying to film manta rays at Manta Point Komodo or capturing clean reef scenes without fins in the frame.
From Capture to Final Image: Settings, Video, and Editing Workflow
Strong sun, variable depth, and rich blue water define most sessions of Komodo Island snorkeling. Dialing in the right settings and a simple editing workflow will keep your footage consistent even when conditions change from site to site.
Core camera and white balance settings for snorkeling
For most Komodo snorkeling camera settings, start with shutter priority around 1/250–1/500 s to freeze fish and your own movement, auto ISO up to 800–1600 depending on your sensor, and continuous autofocus. The best white balance for Komodo snorkeling photos when shooting JPEG is often a custom underwater preset or “Cloudy,” then fine‑tuned later; for RAW, leave it on auto and correct color temperature and tint in post.
Shooting sharp stills and working with turtles and mantas
To shoot sharp snorkeling photos in Komodo, stabilize your body first: keep one hand on your housing, exhale gently, and time shots between kicks. When you shoot turtles while snorkeling in Komodo, angle yourself slightly ahead of their path and maintain at least 2–3 m distance to avoid disturbing them. To photograph manta rays while snorkeling in Komodo, stay at the surface above or beside cleaning stations, letting the rays approach on their own instead of diving down toward them.
Komodo underwater video settings and color correction
For Komodo underwater video settings on an action camera, 4K at 60 fps with a medium or wide field of view works well for both mantas and reef scenes. Use stabilization, but avoid the ultra‑wide “linear + horizon lock” modes if they crop too much. Color correction for Komodo underwater videos usually involves boosting reds and oranges, slightly lifting exposure, and adding subtle contrast; avoid over‑saturating blues, which can make coral look unnatural.
Examples: manta rays, turtles, and dugong expectations
Many visitors focus on how to film manta rays at Manta Point Komodo: start recording before the ray arrives, keep your movements minimal, and let it glide through your frame. Snorkeling with turtles Komodo photos are common at shallow reef sites around Siaba Besar and similar bays. As for whether you can see dugong while snorkeling near Labuan Bajo, sightings are rare and unpredictable; treat them as a bonus encounter, not a guaranteed subject.
Editing Komodo snorkeling footage in Lightroom or similar tools
When editing Komodo snorkeling footage in Lightroom or other software, apply a consistent workflow: correct horizon and cropping, adjust white balance to remove green casts, then fine‑tune exposure and contrast. For stills from Komodo Island snorkeling, local brushes or masks can help brighten faces behind masks and bring back detail in darker coral. To understand when visibility and light are typically best, see our guide on the best time to snorkel in Komodo.
Planning a dedicated photo‑focused itinerary
If you’re wondering how to plan a Komodo photo trip from Labuan Bajo, start by aligning your dates with the dry season when visibility often ranges from 15–30 m. Combine dawn hikes at Padar with mid‑morning snorkeling over bright reefs and late‑afternoon manta sessions. Multi‑day itineraries such as our 3‑day snorkeling route or extended 5‑day Komodo snorkeling itinerary give you more chances to revisit key sites when light and current are ideal.
Frequently Asked Questions
What are the best underwater photography tips for Komodo Island snorkeling if I’m a beginner?
For beginners, keep it simple: use a wide‑angle lens or action camera, get close to your subject, and shoot with the sun behind you. Set a fast shutter speed (around 1/250 s) to reduce motion blur. Practice neutral buoyancy so you don’t kick up sand, and focus on shooting fewer, better‑composed frames instead of constant bursts.
How should I photograph manta rays while snorkeling at Manta Point Komodo?
To photograph manta rays while snorkeling at Manta Point, stay on the surface above or beside the cleaning stations and let the rays approach. Use a wide field of view, continuous autofocus, and at least 1/500 s shutter speed. Avoid chasing or diving toward them; staying still and horizontal usually results in closer passes and more natural‑looking images.
What are good GoPro settings for snorkeling in Komodo?
The best GoPro settings for snorkeling Komodo are 4K, 60 fps, wide FOV, and auto white balance, with stabilization turned on. In bright conditions, lock ISO between 100–800 to reduce noise. Add a red filter below 3–5 m and use a simple floaty or tray for stability. Always run a short test clip at the first snorkel site, then adjust exposure compensation if needed.
How deep is the water at the Batu Bolong snorkeling area, and is it safe for photos?
At Batu Bolong, the reef rises close to the surface while the surrounding water can exceed 30–50 m in depth. Snorkelers stay over the shallow, protected shoulder of the reef, usually within 3–8 m of depth. Currents can be strong, so you should follow your guide closely, stay within the designated safe zone, and focus on shooting while drifting rather than fighting the flow.
Can I rent an underwater camera in Labuan Bajo for snorkeling in Komodo?
Yes, limited underwater camera rental in Labuan Bajo for snorkeling is available through some operators and shops, but supply is not guaranteed in high season. If you plan to rent, reserve in advance and verify whether housings and spare batteries are included. On arrival, test the camera and housing in shallow water to ensure there are no leaks and you understand all the controls before sailing.
How should I edit underwater photos from Komodo for the best colors?
To edit underwater photos from Komodo, start with white balance to remove excessive blue or green, then add moderate contrast and clarity. Gently increase vibrance rather than saturation to keep skin tones and coral natural. Use local adjustments to brighten subjects and darken distracting backgrounds. If you shoot RAW, you’ll have far more flexibility for color correction compared with JPEG files.
Are there Komodo snorkeling tour packages designed for content creators and photographers?
There are Komodo snorkeling tour packages for content creators that prioritize flexible schedules, sunrise and sunset sessions, and repeat visits to key sites like Padar, Pink Beach, and manta areas. Private or small‑group trips, such as tailored Komodo yacht charters, make it easier to plan around light, crowds, and specific shots, and to coordinate with guides who understand camera workflows.
Where can I find reliable reviews and photo examples from Komodo snorkeling trips?
Tripadvisor Komodo snorkeling review photos are a useful way to gauge real‑world water clarity, typical wildlife, and how crowded sites can be at different times of year. Combine those user images with recent trip reports, social media posts geotagged around Labuan Bajo and Komodo National Park, and our own site guides such as the best time to visit Komodo for snorkeling and mantas to build realistic expectations.
The Photographer’s Code: Safety, Ethics, and Park Regulations in Komodo
The most breathtaking underwater photo is worthless if it comes at the expense of the ecosystem. As a content creator in a UNESCO World Heritage Site, your first priority is conservation. This means adopting a “look, don’t touch” mantra for everything, from the smallest piece of coral to the largest manta ray. Maintain a respectful distance from all marine life; never chase an animal for a shot. The best encounters happen when a creature approaches you out of curiosity, not fear. Buoyancy control is your most critical skill. Practice staying level in the water to avoid accidentally kicking or standing on fragile corals, which can take decades to recover from a single misplaced fin.
Adherence to park rules is non-negotiable and central to a successful photo expedition. This is where you learn how to follow ranger instructions while snorkeling Komodo. Your guide and boat captain operate under strict park guidelines, and their briefings before entering the water are mandatory listening. At sites like Padar Island or when trekking on Rinca, rangers lead the way for safety. In the water, especially in areas with strong currents or sensitive wildlife, their directions are just as critical. They will point out the safest entry and exit points and instruct on how to behave around specific animals. Remember, the mandatory ranger fee of approximately IDR 150,000 per group isn’t just for trekking; it’s for the stewardship and safety of the entire park experience. Disregarding their advice not only endangers you and the wildlife but can also result in your trip being cut short.
Mastering Your Subjects: A Field Guide to Photographing Komodo’s Marine Stars
Capturing professional-grade images while snorkeling requires adapting your technique to the subject and environment. The fundamental rule for how to shoot sharp snorkeling photos in Komodo is to minimize the amount of water between your lens and your subject. Water degrades clarity, color, and sharpness. This means getting close—safely and ethically. Shoot at a slightly upward angle to use the bright surface light to your advantage and create better separation between the subject and the background reef.
Komodo’s cast of characters demands different approaches:
- Manta Rays: The key to learning how to photograph manta rays while snorkeling Komodo is patience. At Manta Point (Karang Makassar), find a spot and wait for them to glide by. Chasing them is futile and stressful for the animals. The best lens for Komodo underwater photography involving these giants is a wide-angle, which allows you to capture their full wingspan even when they are close. Frame your shot to include the sunlit water surface or another snorkeler for a sense of scale, transforming a simple sighting into a collection of compelling Komodo snorkeling with manta rays photos.
- Sea Turtles: To understand how to shoot turtles while snorkeling in Komodo, you must anticipate their behavior. They are often found grazing on the reef. Approach slowly from the side, giving them a clear path. The magical shot is often when they ascend for a breath of air; position yourself to capture that moment against the backdrop of the sun’s rays.
- Vibrant Reefs & Unique Sites: Some of the most iconic underwater photo spots Komodo offers are its dynamic reef systems. When asked how deep is the water at the Batu Bolong snorkeling area, the answer is complex; it’s a pinnacle that drops to over 70 meters, but snorkelers stick to the sheltered top section in 2-10 meters of water, teeming with anthias and fusiliers. For those wondering how to take drone photos of Taka Makassar sandbank, permission from your guide is essential. Fly only when other boats are distant to respect their privacy, and aim for low tide when the sand’s beautiful contours are most visible.
- Rare Encounters: While visitors often ask “can you see dugong while snorkeling Labuan Bajo,” sightings are exceptionally rare and require significant luck in specific seagrass beds away from common tourist routes. Focus your energy on the guaranteed marvels Komodo offers. To ensure you have the flexibility to wait for these perfect moments, consider exploring options for a private Komodo boat charter, which gives you full control over your itinerary. For more guidance, see our deep dive into photographing Komodo’s big animals.
More Questions About How to Capture the Perfect Underwater Photos While Snorkeling in Komodo
What are the best camera settings for underwater photography in Komodo?
The best camera settings for underwater photography in Komodo prioritize freezing motion and capturing color. Aim for a fast shutter speed (1/250s or higher), a low ISO (100-400 in bright sun), and an aperture of f/5.6-f/8 for a decent depth of field. If you’re not using a red filter, shoot in RAW format. This captures more data, giving you maximum flexibility to correct the blue/green color cast during editing.
What’s the best underwater camera for a Komodo snorkeling trip?
The best underwater camera for a Komodo snorkeling trip depends on your goals and budget. For convenience and great video, a recent GoPro or DJI Osmo Action is fantastic. For higher quality stills, a dedicated waterproof compact like the Olympus Tough TG-6 excels. For ultimate control and image quality, a mirrorless camera (like a Sony a6000 series or Canon R series) in a dedicated underwater housing is the top choice.
How should I approach editing underwater photos from Komodo?
Your primary goal when you edit underwater photos from Komodo is color correction. In software like Adobe Lightroom or Photoshop, start by adjusting the white balance to restore reds and yellows. Use the Dehaze tool sparingly to add clarity, boost contrast to make subjects pop, and sharpen the final image. Cropping can also significantly improve your initial composition by removing distracting elements.
Are there shops for underwater camera rental in Labuan Bajo for snorkeling?
Yes, you can find an underwater camera rental in Labuan Bajo. Several dive centers and a few dedicated photo shops offer gear, primarily action cameras like GoPros. If you need a more advanced setup, it’s crucial to arrange it well in advance as availability is limited. We always recommend confirming rental options before you arrive, as you don’t want to rely on finding a Labuan Bajo shop to rent underwater camera on the morning of your trip.
What are some simple underwater photo tips for beginners in Komodo?
Here are three essential underwater photo tips for beginners: 1) Get close to your subject to minimize water distortion and improve color. 2) Keep the sun behind you or to your side to illuminate the scene naturally. 3) Hold your camera as steady as possible and take multiple shots (burst mode) of moving subjects like fish or turtles to ensure at least one is perfectly sharp.
Can I book a Komodo snorkeling trip with an underwater photographer?
Absolutely. You can book a Komodo snorkeling trip with an underwater photographer, which is an excellent way to get professional-quality photos of your experience. This is typically arranged as part of a private charter. The photographer can capture stunning images of you and the wildlife, and also provide real-time coaching. This service is ideal for a custom multi-day Komodo liveaboard focused on content creation. For more details on trip types, see our guide on choosing the right Komodo boat.
This guide does not operate boats. Bookings are fulfilled by Komodo Luxury, and this site may earn a referral commission.
Keep reading
More from the journal
Best Time, Gear & Tips
The Best Snorkeling Gear for 2027: What to Bring to Komodo
Visiting the Komodo Islands in 2027 requires not just enthusiasm for the vibrant underwater world but also the best snorkeling…
22 min read
Best Time, Gear & Tips
Technology in Snorkeling: Gadgets to Enhance Your Komodo Experience
The integration of technology into snorkeling is transforming how enthusiasts experience the waters around Komodo Island. With the introduction of…
20 min read
Best Time, Gear & Tips
Predicting Snorkeling Trends in Komodo for 2027
The Komodo Islands, renowned for their diverse marine life and vibrant coral reefs, are predicted to witness significant changes in…
23 min read
Best Time, Gear & Tips
The Evolution of Snorkeling Tours in Komodo
The evolution of snorkeling tours in Komodo reflects a shift from basic, local-led adventures to sophisticated, eco-conscious experiences. As demand…
22 min read
Best Time, Gear & Tips
What To Pack For A Komodo Liveaboard & Island Hopping
On a liveaboard you are essentially living on a boat for several days, usually three to seven. Your packing should…
23 min read
Best Time, Gear & Tips
Advanced Snorkelers & Divers: Tackling Komodo’s Currents Safely
Komodo National Park is known for its strong and unpredictable currents, making it essential to understand how they work before…
25 min read